
Thursday, 4 October 2018
Day 4 - create your own sentiment using more than one stamp set.
Here is my card - using Thoughtful Banners and Sunshine Sayings plus a die from Sunshine Wishes. I thought I could send it as encouragement for someone undergoing medical treatment.


Wednesday, 3 October 2018
Day 3 - Use every stamp in one set
Day 3 brings one of the most difficult challenges - for me! - which is to use every stamp in a set. This often poses a problem, as many sets can be used for more than one occasion - wedding, birthday, get well, thinking of you - so I made my choice for one that contained just one sentiment, though not only one image expressing that sentiment - thanks! Tropical Chic is my choice - and I managed to include every image in the set! Not that I would normally put this much on a card - not exactly clean and simple is it?


Tuesday, 2 October 2018
World Card Making challenge - day 2
Today's challenge was to use the largest stamp you own - I've chosen a background stamp - Buffalo Check - and made a very quick Christmas card, adding in the Dashing Deer stamp set.


The Buffalo Check was stamped in Call Me Clover. I used a mask to create the circle and then doodled some dots around the edge to highlight the shape. The sentiment is stamped in Lovely Lipstick.
Sunday, 30 September 2018
Enjoy Life
Gosh it's been ages since I've posted here, but I assure you I have been creating cards - just not taken the time to post. Mostly I've been making Christmas cards - my favourites really - but today I am taking part in Eureka Stampers 7-day challenge celebrating World Card Making Day! Simone Bertrum does a fabulous job of organising other SU demos to get making, so I'll do my best to join in every day.
Day 1 - is to use a never-before inked stamp - so mine is the bicycle and sentiment from Enjoy Life:


Day 1 - is to use a never-before inked stamp - so mine is the bicycle and sentiment from Enjoy Life:
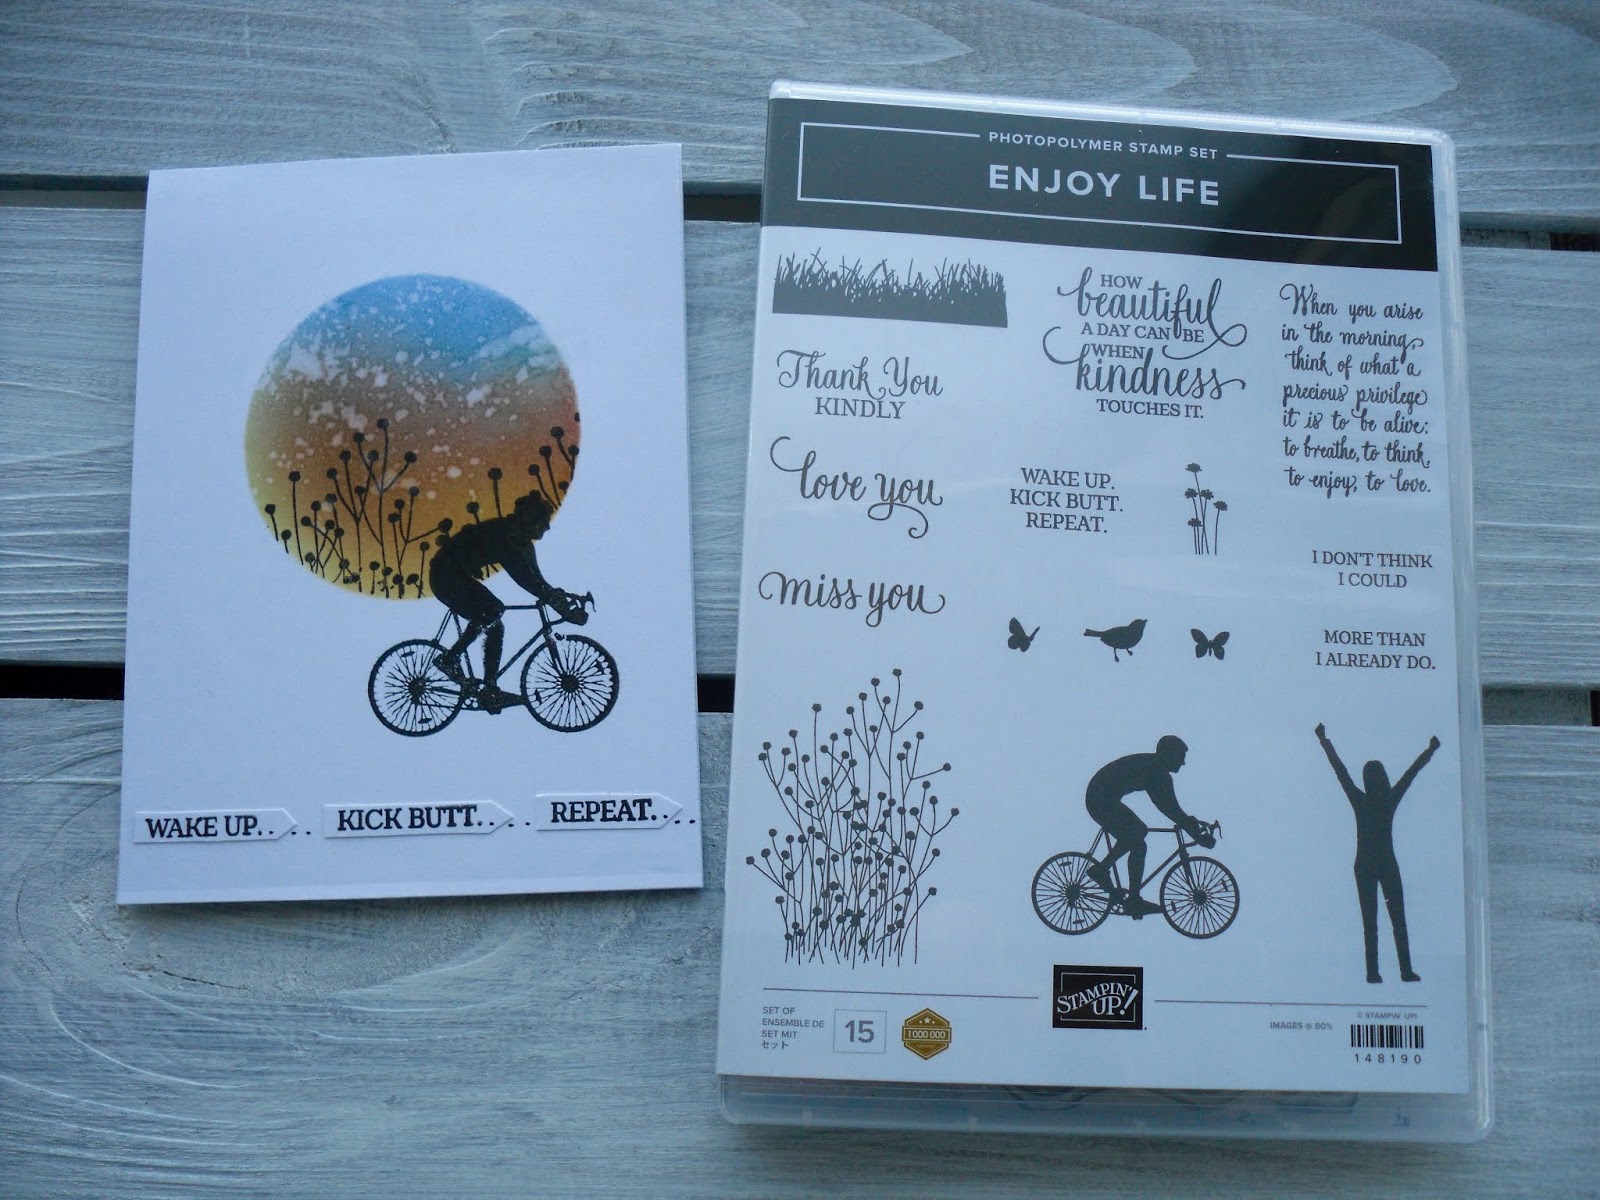

For my clean and simple card, I've used the masked circle technique, to add interest to the focal image of the bicycle. I also stamped the sentiment 3 times so that I could cut it up and place it along the bottom.
Saturday, 18 August 2018
Hello Little One
My card today is a very clean and simple one - to welcome a new baby, and also to join in the challenge at Freshly Made Sketches.
Here is the sketch:

and my interpretation:

Supplies:
Stamp:Stampin' Up! Little Elephant
Ink: Rich Razzleberry, Blueberry Bushel
Punch: Two elephants
Embossing Folder for card front: 3D Subtle
Sunday, 12 August 2018
Wishing You all the Best
Today's card uses the limited stamp set and bundle - Blended Seasons - a beautiful set for using with blend markers or any other kind of colouring medium. this set is only available till the end of August, or when supplies last, so if you are interested, don't wait too long to purchase it.

The stamps are made of red rubber, so perfect for using with Stamp and Write markers and the Stamparatus. Just colour the lines as desired, huff on them, then stamp - and repeat. I tend to colour the stems and leaves first, as you can colour as often as you wish - no need to hurry, as the card is always in the same position - this way you can colour up as much or as little as you like - it is a lovely way to achieve a soft watercolour look. In fact, I did use my aqua brush a little, to smudge or blend the colour out.
Can you see the lovely white stitched frame behind the flower spray? That is from the coordinating framelits - I cut 3 and glued them one on top of the other, for depth. There is no die for these flowers, but they didn't take long to fussy cut out. The butterfly is a die from my stash - just to balance out the design. It is very difficult to see, but the front of my card is covered with the large dynamic folder - called Subtle - it has the look of a linen card and I love it.
Monday, 23 July 2018
CASEing a card by I'm in haven and some new products
I'm very fond of the Clean and Simple style of card making, and my first card typifies this. It is CASed from Pinterest - I'm in haven - and although it uses the retired Petite Petals stamp and punch, the sentiment is very new - from Blow Out the Candles, and the ink colours are all current - Lemon Lime Twist, Bermuda Bay, Call me Clover. The tiny flowers are mounted on the smallest square from the Square framelits.

My next two cards use the Beautiful Bouquet Bundle - lots of lovely flowers and stems.

I cut these pieces from white card, then lightly watercoloured them in lilac tones and blue/green. I used a stitched rectangle to emboss a subtle shape on the front.

Same bundle used here but the different design and colours used make it seem totally different. I love the combination of Smoky Grey, Real Red and white, but heat embossed the wrapper with Silver embossing powder.
Saturday, 30 June 2018
3D Embossing Folder - Lovely Floral Dynamic
I was enthralled recently watching Jennifer McGuire use embossing folders and ink to create interesting and subtle cards - you can click on the link to her blog post HERE.
As I have now acquired the beautiful 3D embossing folder in the new catalogue at Stampin' Up! called Lovely Floral Dynamic, I thought I'd give her techniques a try.

The first card uses only SU products, except for the frame - I don't have a frame large enough to feature the flower, so used one from my stash. If I was holding a class, I'd find some other way around this. The paper is from the paper pad - Tropical Escape, the die cut word is from Celebrate You thinlets, You from Sunshine Sayings and I used thick Whisper White for my card base.

For these two cards I used some card embossed with Swiss Dots and used the reverse side - coordinating with the dye ink I used on the embossing folder - Hero Arts Mint Green and Versacolour Petal Pink.

I did not achieve the perfect results that Jennifer managed (isn't she wonderful?) but I am very happy with them.
Wednesday, 27 June 2018
Slimline Folio
Today I am featuring a nifty idea I saw on Sam's blog - Mixedupcraft - a few days ago. It is a very handy folio for odds and ends of papers we all have a habit of collecting - using some DSP and a laminator and folder. You can see Sam's tutorial here. The size is ample - it uses one A4 laminating cover, and is slightly smaller than A5 when folded up. (The front is 8" x 5.5")
I have made a folio for myself (as a trial) and this one is for a friend who regularly has a lot of papers to gather together as she organises excursions for her club. I hope she finds it useful! The laminated cover means it is sturdy as well:)


I have made a folio for myself (as a trial) and this one is for a friend who regularly has a lot of papers to gather together as she organises excursions for her club. I hope she finds it useful! The laminated cover means it is sturdy as well:)

I've used retired DSP (I have plenty!) and the large letter dies.

Inside there are two pockets into which those endless bits of paper can be stored.
Monday, 7 May 2018
Tuscan Vineyard
What a picturesque stamp set the Tuscan Vineyard is! My card uses one of the images, mounted onto Kraft card - but Crumb Cake would be equally good - and coloured with some Stamp n Write markers directly onto the red rubber stamp. This is the best thing about red rubber stamps - you can colour on the stamp, and using the Stamparatus, can repeatedly colour and stamp until you are happy with your result.

The oval was cut with a stitched frame lit, and the base of the card is stamped with the olive image.

The oval was cut with a stitched frame lit, and the base of the card is stamped with the olive image.
Monday, 23 April 2018
Magical Mates
Just sharing a bit of creative fun I had using the Magical Mates and Magic Day products by Stampin Up!. They are both retiring soon, which is a shame, but I couldn't resist putting them to use - and I'll be keeping these sets, for those birthday cards I need for youngsters.
Firstly, I must credit all the ideas I've seen on Pinterest - by such talented crafters, and especially to Bronwyn Eastley, and Australian demo, who has produced a fantastic tutorial on an absolutely amazing castle scene. However, I don't own all the little extra dies needed to recreate her 3D diorama, so here I have a largish step card, using the Magical bundle, SU blends, but paper and stencils from my stash.

I've used the whole A4 card for this card - the middle step is 3.25" wide, and the side steps are 2.5" wide. I've made an intermediate step to give 3 layers. I've added the turrets (a MFT banner die trimmed to remove a little of the points) and the roof of the castle - just triangles cut to adhere to the top of the castle keeps. The door is cut from woodgrain paper using a tag shape, trimmed a little at the bottom, and the trees are a bit of fantasy - as if there wasn't enough! I sponged the slits for the windows using the same stencil as the brick facade, carefully masking the area around it.
Nowhere near as authentic as Bronwyn's but I had such fun. I hope you like it!
Tuesday, 27 March 2018
Happiest of Birthdays
The other day while browsing Pinterest, I came across a beautiful stamped card made by Poppaea, UK, using some of the loveliest SU stamps available. I was so taken by the effect, I immediately tried to CASE her cards - this is the link to her post.
My effort is not so neatly executed, but I did have a lot of fun creating this card - the square card is 6" x 6" and the smaller card is the standard A6 card size.


My effort is not so neatly executed, but I did have a lot of fun creating this card - the square card is 6" x 6" and the smaller card is the standard A6 card size.


I love the whimsical style Catherine has used, and the colour scheme is so soothing.
Stamps used: Blooms and Wishes, Painted Harvest, Number of Years
Inks: Flirty Flamingo, Blushing Bride, Calypso Coral, Sky Blue, Pool Party, Pear Pizzazz, Lemon Lime Twist, Island Indigo, Crushed Curry
Card: Dapper Denim, Whisper White
Friday, 9 February 2018
Best Wishes
I'm joining in again at Freshly Made Sketches for their sketch # 323 - just in time I think!

I really like the design of this sketch - the alternating colours or textures or DSP - it can be anything. I originally had one section embossed white card as below, and the alternating card is Very Vanilla. It looked too flat against the leafy vine, so I covered it with some retired vellum in gold - I think this lifts it up! My flower from Eclectic Layers thinlets is also backed by the vellum Added some punched leaves and the sentiment is from Blooms and Wishes. I think I will be using this design again - it would make a great masculine card with bold colours and say a square sentiment in the centre.

Monday, 8 January 2018
Party Pandas
Sale-A-Bration is underway at Stampin' Up! which means that for every $90 you spend in an order, you choose an item from the Sale-a-Bration catalogue for free! How good is that! Of course, if you spend $180 you can receive 2 free items, 3 free for $270 and so on!
One of the cutest stamp sets in Sale-a-Bration, in my opinion, is the one I've used today - it's called Party Pandas. Three cute panda bears, a couple of sentiments and a little pattern stamp which fits into the balloon, or can be used to create a decorative border. I used Basic Black to stamp my pandas, after trying Memento Black at first, but the coverage just wasn't deep enough. You will see the difference below.


Memento Tuxedo Black used in the card above and the one below

 SU Basic Black used in the card above and the card below


Lots of ideas here, and I had such fun playing with this set. If you would like to view the SAB catalogue, or the Occasions Catalogue please click on the pictures in the side bar, which will take you to the pdf of each catalogue. Please message me if you would like to receive the hard copy and I will get it in the mail for you.
One of the cutest stamp sets in Sale-a-Bration, in my opinion, is the one I've used today - it's called Party Pandas. Three cute panda bears, a couple of sentiments and a little pattern stamp which fits into the balloon, or can be used to create a decorative border. I used Basic Black to stamp my pandas, after trying Memento Black at first, but the coverage just wasn't deep enough. You will see the difference below.


Memento Tuxedo Black used in the card above and the one below


Lots of ideas here, and I had such fun playing with this set. If you would like to view the SAB catalogue, or the Occasions Catalogue please click on the pictures in the side bar, which will take you to the pdf of each catalogue. Please message me if you would like to receive the hard copy and I will get it in the mail for you.
Saturday, 6 January 2018
Painted Harvest - 2 ways
I first used the Painted Harvest stamp set to create Christmas cards, using the flower background as a wreath. They made very pretty but simple cards to create in a hurry. I'm sure you've all seen them on Pinterest, so will just post my photo here.

But once the rush of Christmas was over, I took another look and created a couple of cards using Calypso Coral and Peek-a-Boo Peach for the flowers.


My style is usually clean and simple, so I tend not to put a lot on my card - these I feel have just enough!

But once the rush of Christmas was over, I took another look and created a couple of cards using Calypso Coral and Peek-a-Boo Peach for the flowers.


My style is usually clean and simple, so I tend not to put a lot on my card - these I feel have just enough!
Monday, 18 December 2017
Christmas Quilt stamp set
When Stampin' Up! recently offered free shipping, I jumped right in and ordered the Christmas Quilt stamp set. The reason I had not bought this at the start of the Holiday Catalogue, was that I already owned a quilt die or two, and didn't think I could use another one. However, when you look more closely at the stamp set that coordinates with the quilt dies, you see there are some really interesting effects that can be achieved with this stamp set. Sadly, it is retiring at the start of the new year, but I have really enjoyed making cards with it.

 I used the triangle pattern pieces to create these small trees - that is the same pattern stamped in pink above - a strip of DSP below and Merriest Wishes in Real Red from the set Merriest Wishes.
 Another stamped quilt - Smokey slate and Flirty Flamingo and this time mounted at an angle over Flirty Flamingo card.

The star outline was stamped in Fresh Fig, and the pattern fills in Lemon Lime Twist and Sweet SugarPlum, then stamped a border around it with a stamp that looks like blanket stitch. This was mounted on a top fold card, and the pattern adhered below between strips of Fresh Fig card.


Sunday, 3 December 2017
Wedding card from Colourful Seasons
Just a quick post to share this card made from the Colourful Seasons stamp set. I have just purchased this stamp set, as I hadn't really 'noticed' it before, but due to my doubling up on a stamp set in a recent order, I had to find another set to replace my duplicate one, and decided on this. I'm so glad I did, as there are 'hundreds' of uses for this stamp set - autumn, summer, winter, spring (just like the title suggests lol) but also weddings, sympathy, holidays, and simply celebrating life! Now I'll have to buy the matching dies, as those flowers are just beautiful, and 'need' to be popped up!

Inks: Crumb cake, Powder Pink, Sweet Sugarplum, Baked Brown Sugar
Card: Powder Pink, Whisper White
Stamps: Colourful Seasons, Timeless Textures
Friday, 24 November 2017
Gift packaging
Today I have some gift packaging to share - the first one is sized to fit Revlon lip gloss - finished container measures 5.75"high by 1.1/8th" on all four sides. As you can see it has a milk carton style closure, which I will eventually punch with two holes and thread ribbon through.
Card stock - 6.75" x 5"
Stamp white card stock with the two large circles from Year of Cheer stamp set - I used the combinations of Sweet Sugarplum and Festive Fig, Crumb Cake and Baked Brown sugar and Tranquil Tide and Lemon Lime Twist (not shown here), My tags used the new everyday punch, and the Tin of Tags stamp set for the sentiments.
On short side score at 1.1/8, 2.2/8, 3.3/8, 4.4/8 and 4.7/8"
On long side score at 1.25, 5.75"
Fold and burnish all score lines.
Cut up all score lines for the base and remove the small rectangle at the bottom of the flap.
Apply strong tape to the narrow flap, fold over the box and secure to both edges together.
Fold up the flaps of the bottom in this order - both sides first, then the back flap - adhere glue to the front flap and close over to secure.
For the top, pinch the front and back edges with your fingers, and gently ease the sides below the first score line to create the milk carton profile. At this stage, punch one or two holes in the top for closure with ribbon. Or you can use small clips.


My next box and lid was demonstrated by Caroline of craftycarolinecreates - I followed her video description to the letter and am thrilled with how it looks in real life. The lid is stamped and reinforced by a double fold, and the base is plain card stock. If you haven't found Caroline before, please visit her blog, as she is an amazing crafter and so easy to follow. Wouldn't this make a lovely gift box for that special person?

Flowers from an unlikely source
I'm back today with a card I CASed from Jill at Paper Daisy Crafting in the UK, which uses the lovely DSP Year of Cheer as a base to create flowers. Jill used SU new blends, but I don't have them yet, so unfortunately, I have had to resort to my long-time owned alcohol markers. But I'm sharing anyway, as I think they make a beautiful card - or two.

This sentiment is from Window Shopping stamp set - I just love that font!

This sentiment is the single stamp Sylised Birthday - both stamps are still current.
To create the flowers, Jill used the pansy punch placed carefully over the DSP to include an interesting pattern for the centre, then coloured the flowers with the blends - darker in the centre then lighter. You would only need one set for each of these, as you can create a lovely gradient of colour by colouring over a few times, then leaving the lightest colour as it is.
My thanks to Jill for sharing this super idea!
Monday, 23 October 2017
Sending Love and Hugs
Today I'm sharing a card I CASed from Leonie at Stamp a latte . I needed a card in a hurry (don't we always need to make one especially?) for a friend who was struggling with some disheartening health results, and when I saw her card published the other day, I knew it was the one for this occasion!

Now Leonie was actually showcasing the 'ink smooshing' technique, but I chose instead to use colorburst powders, but in almost every other way, it is a direct copy of her lovely design. I have popped my love die cut up on fun foam to ensure this sentiment stood out!
Stamp: Sunshine Sayings
Die: Sunshine Wishes
Subscribe to:
Posts (Atom)